Edit BIM Models
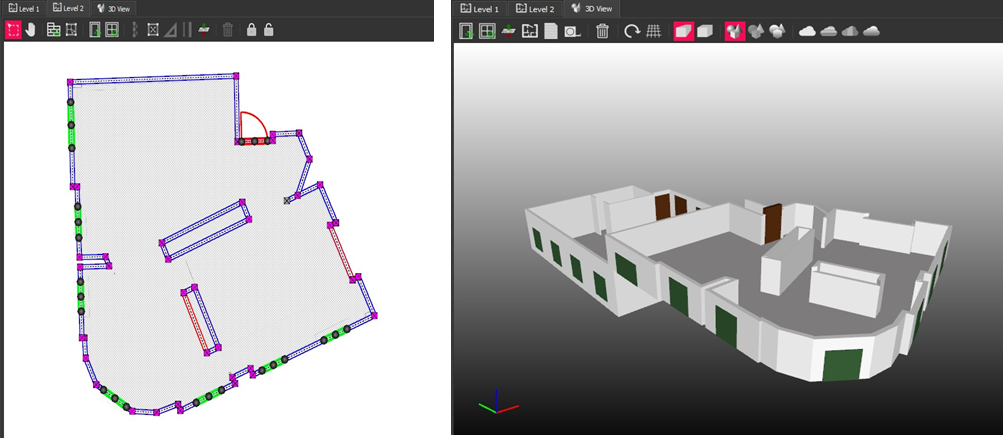
When you open BIM model in the viewport, there is a tab for each 2D story, and another for the 3D model. All tabs have a toolbar, context menu, and navigation instructions at the bottom.
You typically do initial editing in 2D, then refine in 3D. Edits you make to one view are immediately applied to the other.
Edit Building Story Tools in 2D View

- In a 2D view, switch between Select
 and Pan
  .
. - Use the tools to refine the BIM model: combine walls and make them square; split walls; add and delete walls, partitions, doors, windows; equalize wall heights, define rooms, for example.
Edit Walls in 2D View
Lock and Unlock Walls
- In a 2D view, you can select one or multiple walls and Lock
 them so you they are unaffected by changes you make to surrounding walls.
 - Locked walls have black nodes and are shaded grey:
 .
. - Select and click Unlock
 to enable editing.
Move End Nodes
- You can move the start and end points of a wall by selecting and dragging the nodes at either end.
- Where the nodes of two or more elements are at the same point, they are pink; if they are just near, they are gray. To connect existing nodes, roll the mouse wheel to zoom in, then click and drag one of them until it overlays the other:

- You can then Combine, Make Square, or just drag the shared node.
Shift Wall Position
- By default, nodes are at the center of each end. When you select a single wall, you see clickable triangles to cycle through shifting walls in, out, or centered. You can also press Spacebar.

Change Wall Width
- Hover over a wall edge and when you see a pinky-orange highlight, drag the edge.
- Whether the wall widens or narrows in one direction or both depends on whether the nodes are centered or on corners (whether the wall has been shifted).

Split Wall
- Just double click where you want to create new, overlapping nodes.
Combine, Extend and Join Walls
- To combine walls, they must have a node in common (indicated pink):

- Click one wall and Ctrl+Click the other:

- Click Combine Walls
 :
:
- Where the ends of two walls are close, but not joined, select both, then right click anywhere in a floor plan and select Extend and Join.
Show Intersection Angles
- To display the angles of wall intersections, right click anywhere in a floor plan and check Show Intersection Angles.
Make Square
- To align contiguous walls that are nearly at right angles, as right angles, select with Ctrl+Click.
- Click Make Square
 .
.
Equalize Wall Heights
- In a 2D view, select some walls and click Equalize Wall Heights
 to open the dialog.
 - Choose a height for the selected walls and click Use.
Edit, Copy, and Paste Object Properties
- In a 2D view, select a wall, door, window etc.
- In the Properties window, change the values for Width, Height, Thickness, Elevation etc.
Copy and Paste Object Properties
- You can select a wall, door, or window and copy its dimensions to other objects of the same type.
- In a 2D view, select an object and press Alt+C (or right click and select Copy Object Properties).
- Select other objects of that type, and press Alt+V to paste those properties (or right click and select Paste Object Properties).
PointFuse remembers the most recently copied properties for each object type in the current session of the project, so you can switch between pasting properties to walls, doors, and windows, without having to copy again.
Set Story Elevation
- In a 2D view, right click to see the context menu and select Set Story Elevation
 . (There is an equivalent tool on the 3D view toolbar.)
 - In the dialog, change the current value and click OK.
Add Objects in 2D View
Add Wall or Partition
Partitions create boundaries for rooms where there are no walls. Partitions are not visible in the 3D view.
- In a 2D view, click Add Wall
 or Add Partition
  .
. - In a 2D view, left click once for the start point, again for the end point of that wall or partition - which will also be the start point of the next wall or partition.
- Press Esc to stop adding walls or partitions.
Add Door or Window
- In a 2D view, click Add Door
 or Add Window
  . (There are equivalent tools on the 3D view toolbar.)
 - Click once on a wall or partition at the center point of the door or window.
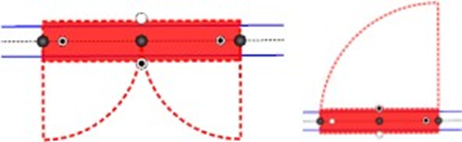
- Doors are red and windows are green:

- Slide the position by dragging from the center node, or change the width by dragging the nodes at either end.
- To add opening directions to a door, click on it to see additional controls. Click in one or both white nodes at the end to specify single or double door, and click one of the nodes along the edge to show the direction of opening:
Identify Rooms (fit floor slabs and ceilings)
- Rooms must be fully enclosed by walls and/or partitions. The tool either identifies all the rooms in a story, or, if you have selected some walls/partitions, just the rooms enclosed by those walls/partitions.
- The floor area is indicated by shading in 2D view, and the walls are shifted outwards so the nodes intersect at the inside corners.
- In a 2D view, click Identify Rooms
 . The dialog has checkboxes:
- Shift Walls: external walls will be shifted so the nodes intersect at the inside corners.
- Lock Wall Heights: All walls are made the same height, to fit the room/space height.
- Fit Ceilings: If wall heights are locked, you can fit ceilings as well as floors.
- Where rooms are not created, check for gaps in walls/partitions (gray nodes instead of pink), connect them, and rerun Identify Rooms.
- See the User Guide (https://userguide.pointfuse.com/) for details of other cases where a slab may not be fitted, for example, where there is a room within another room and connected by a single wall.
- Delete any unwanted floor slabs, and shift or adjust wall positions if necessary.
Remove (delete)
- In a 2D view, Click (single element) or Ctrl+Click (multiple elements).
- Click Remove
 .
.
Edit Models in 3D
Compare BIM Model to Mesh Model
- With the BIM model in a 3D view, locate the mesh model in the Project Explorer, right click, and select Add to Classified Mesh Model.
Compare 3D and 2D
Partitions are not visible in the 3D view, and the toolbar and mouse navigation are slightly different.
Transparency and Depth Peeling
- In the 3D view, to adjust the transparency and toggle depth peeling, right click and select Transparency Settings.
Add Door or Window
- In the 3D view, click Add Door
 or Add Window
  .
. - Click once on a wall at the center point of the door or window.
- Doors are brown and windows are green.
Edit Wall, Door, or Window
- In the 3D view, Ctrl+Click to select a wall, door, or window.
- Drag the nodes to reposition or resize the object. For walls, you can only change the height.
- Ctrl+Click to unselect.
Set Story Elevation
- In the 3D view, click Set Story Elevation
 .
. - In the dialog, select one of the stories and click OK.
- In the viewport, raise or lower the selection box corners, or click on the upper or lower planes, to set the lower and upper bounds of the story, then click OK.